
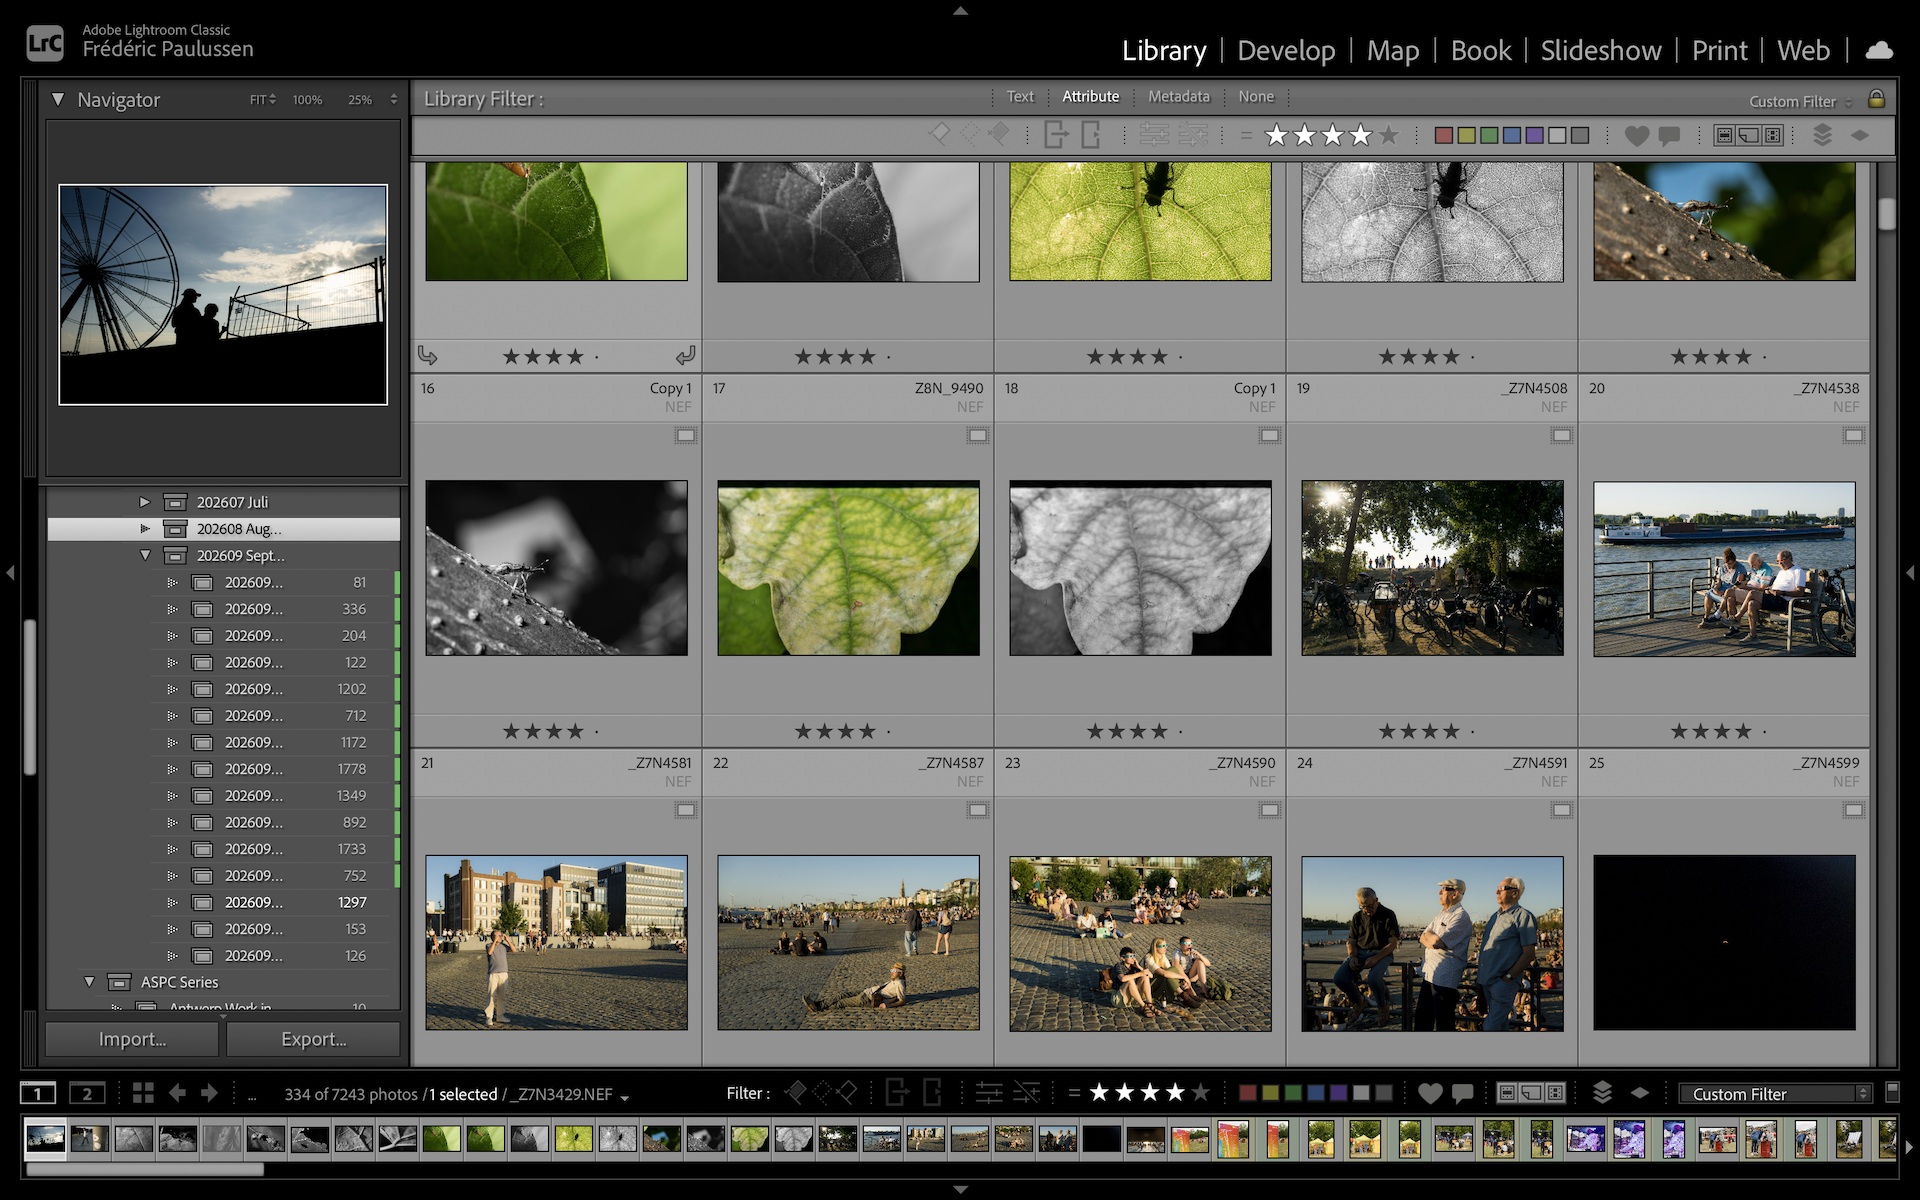
After 10 years of making a new Adobe Lightroom catalog for every project, I changed things up: I made one comprehensive catalog for all my work. Corporate portraits, macro photography, family albums, and street photos are all in the same place. Making things easier for me.
I might be an oddball photographer. I’m both a hobbyist and a working professional. My photography is my full-time income. But I still do it for fun and as a hobby after work.
Lots of photographers either do photography professionally but not in their spare time, or the other way around. Which, of course, is totally fine.
But in my case, it created a fragmented workflow. I had a single catalog for all my street photography. And then I had separate catalogs for each assignment I did for clients.
My old way of cataloging in Adobe Lightroom
Up to this year, each photo project, photo walk, or day out with the family had its own catalog. This worked for my client work, but my street photography and family photos became too fragmented.
So for that reason, I already had a kind of master catalog for those two topics. One for my street photography and one for my family photography. But I still made a new catalog for each client assignment I got.
My idea was to keep things clean, separate, and project-based. I also thought that one catalog would be too intense for my hard drive.
But then I got a good explanation about smart previews and master catalogs and decided to give it a shot.
How does a Lightroom catalog work?
Let’s have a look at what a catalog in Adobe Lightroom actually is. I see it as a box. I put photos in the box, label the box, and then place it in a big storage room. Some of the boxes were very empty. And, to be honest, most boxes got buried under newer boxes and were never seen again.
So, now I put everything in one big box. All my photos, regardless of how, for whom, and when I make them, are put in one big box. In that box, I use folders and labels to keep everything organized.
In Lightroom, those things are called collections and keywords. More on that later in the article.
Single catalog vs. multiple catalogs: what works best?
So what is the difference between making a single master catalog or one for each project? Because making one for each project is kind of like putting them in a folder in your master catalog, right?
There is no right or wrong answer here; it’s about what workflow works best for you. Ofcourse, both have advantages and disadvantages.
Master catalog advantages:
- Having all your photos in one place, you can easily search between them. If you label them correctly, you can easily search by shot type, location, camera used, and more.
- Since Lightroom Classic only allows one catalog to be open at a time, a single catalog lets you edit a personal shoot while a massive corporate event exports in the background.
- You can filter your entire archive to see which lenses or cameras you use most frequently across all your projects.
Master catalog disadvantages:
- Longer Backup Times: Because the database contains all your image data, routine catalog backups will take significantly longer than backing up a small, single-shoot catalog.
- If the catalog database becomes corrupted, you risk losing access to the metadata and edits for your entire archive unless you have a verified backup. But this is easily countered by actually backing up your catalog!
- A single catalog becomes chaotic if you do not apply keywords, folders, and collections upon import.
Separate catalogs advantages:
- You back up only the data for a single project, so the process is incredibly fast. You could go years without ever being prompted to back up an old catalog.
- If a catalog file corrupts, you only lose the edits and virtual organization for that specific project, keeping the rest of your career’s work safe.
Separate catalogs disadvantages:
- You must constantly close Lightroom, locate external drives, and reopen the software just to access or reference a past project.
- Compiling a portfolio or a thematic series from multiple years requires manually exporting files from dozens of separate databases and bringing them together externally.
A quick guide on smart previews in Lightroom
For me, a master catalog sounded stupid. I’d have a huge file on my computer with all those photos. Or just loads of broken images in my catalog because the original file was disconnected on a separate hard drive.
Then I got schooled on how Smart Previews work in Lightroom.
What are Smart Previews?
Don’t ask me for the exact science behind them, but basically, Smart Previews are small copies of your original raw file. Small enough to not take too much space on your hard drive, but big enough to do your edits and even exports up to 2560 on the longest edge.
For client delivery, the 2560 pixels probably isn’t enough, but for previews and just social media or blog post exports, it is.
So after delivering your high-resolution files to your client, you can detach the RAWs from your catalog and still work on the photos. You can also export them years later, if you want to make a quick social media post with them.
| Feature | Original RAW File | Smart Preview |
| File Format | Proprietary RAW (e.g., CR3, NEF, ARW) | Lossy Digital Negative (DNG) |
| Maximum Resolution | Native Camera Resolution | 2560 pixels on the longest edge |
| Storage Footprint | Extremely High (~30-90MB per file) | Extremely Low (~1-2MB per file) |
| Offline Editing | Requires active hardware connection | Fully supported offline editing |
| Export Capabilities | Full resolution TIFF/JPEG/DNG | Limited to 2560px proxy exports |
How to set Smart Previews up in Lightroom
Setting up Smart Previews isn’t too hard. You can even do it automatically on import.
Create Smart Previews automatically on import:
- Click the Import button and select the photo you wish to import to your Lightroom (master) catalog
- Go to the “File Handling” tab on the right side of your screen
- Check the box for “Build Smart Previews”
- Complete your import; normally, this setting stays for every import until you remove the checkmark again
Create smart previews manually in your catalog:
- Go into your library module in Lightroom
- Select the photos you want to create smart previews for
- Go to the menu bar and find the “Library” menu
- Go down into the menu, find ‘Previews,’ and then select “Build Smart Previews”
The advantages of one big Lightroom Master Catalog
Knowing how it works is one thing; knowing the potential benefits is another.
All your work in one place
The most upfront reason to use a Lightroom Master Catalog is having all your work in one place. You don’t have to go looking for all these different catalogs if you need that one photo for an article, re-edit, or whatever.
Making series or portfolios is easier
With all your photos together, you can also easily make series with photos from different shoots. That one portrait you made might work well with a street photo from a totally different photo walk.
Or combine your best corporate event photography from different client events to build a strong portfolio on your website.
Searchability through collections and keywords
By using collections and keywords to enrich your photos, you can search for them more easily. Keywording all the family photos with everyone who’s in them; for example, I can find all photos from that one niece quickly. Get an overview of her life in pictures within seconds.
Or looking for all my street photos with silhouettes in them, just a few clicks away from getting the full overview.
Easily copy and paste edits from previous shoots
In a master catalog, you can easily go back to a previously made photo and copy the edits. Ofcourse, you can use presets too, but sometimes you have a specific edit in mind you want to recreate.
Or, if you’re a working headshot photographer going back to clients for additional headshots, you can easily copy and paste their edits to new shots, keeping a consistent look and style without making a preset for each client.
Filter by camera and lenses
If all your photos are in one catalog, you can see how often you use certain lenses. Maybe some lenses or cameras aren’t as useful anymore, so you can sell them. Other times, it can show you how important certain gear is to your workflow.
How to use collections in Lightroom to organize your photos
One of the most important, high-level ways to organize your photos in Lightroom is by using collections. There are three types of them. Using them in combination is the most effective. At least to me.
In collections, you can make a series of photos and combine them in whatever way you want. It’s important to know that removing a photo from a collection does not remove the photo from your catalog.
There are three types of collections:
- Collection folder
- Collection set
- Smart collection
What are Lightroom collection folders?
A collection folder is just one folder of photos you choose to put together. For example, you can use a collection folder for each separate shoot, just as I used to use the Lightroom catalogs.
You can also make separate collection folders with photos from several shoots that make up one long-term project. You can also make separate collection folders for work you consider your best and should be a part of your portfolio.
One photo can be in multiple collection folders, so you can put all your photos from a shoot in one collection folder from that specific photo walk, then make a collection with photos from several photo walks which work together as a series, and then have a separate folder with some of the photos from all those projects and photo walks that you consider your best work.
What are Lightroom collection sets?
Collection sets can’t hold photos, but they can hold collection folders. It’s kind of a collection of collections. For example, I have a collection set for each year; within that year, I have 12 collection sets for each month. Within those months, I have separate collection folders with the actual photos from that photoshoot.
- 2026 (collection set)
- 202601 January (collection set)
- 20260101 New Year celebration (collection folder)
- 20260105 Family reception (collection folder)
- 20260106 Photo walk in Antwerp (collection folder)
- … (collection folder)
- 202601 January (collection set)
I can only add photos to the collection folders, but when I click a collection set, I can see all photos in that set. For example, when I review my past month, I can just click on “202601 January” and see all photos within that folder.
I do the same for my portfolio work:
- Portfolio photos (collection set)
- Portrait portfolio (collection folder)
- Event portfolio (collection folder)
- Street portfolio (collection folder)
What are smart collections?
Smart collections are similar to collection folders, except that adding photos is automatic. You can create rules for photos to be added into that specific collection, and whenever a photo fulfills those parameters, Lightroom automatically adds it to that collection.
You can make the rules as complex as you want. For example, all photos with a rating of exactly 4 stars, containing the keyword “street”, made with my Nikon Z8, using my Nikon 40mm lens, and no edits.
I made a Smart Collection that automatically adds all photos without any keywords. This way, I know which photos I still need to keyword.
How to use keywords in Lightroom to organize your photos
Keywords further improve the searchability of your catalogs. Collections use broader terms like what the photoshoot was, who the client was, and what type of shoot it was; keywords tell you more about each photo.
The collection tells you what photos were made during your trip to Botswana, for example; the keywords then let you add what’s in each photo. For example, during that trip, you might have photographed a beautiful landscape, a lion, an elephant, an ant, and maybe portraits of the locals.
With keywording, you can simply add “elephant”, “wildlife”, “portrait”, and other keywords to those specific photos.
In your library at the side, you can spot a list with all keywords used in your catalog. It’s easy to find all photos with elephants.
The same principle applies as with collection sets. You can nest keywords underneath other keywords. You can apply “Lion” to the lion photo and “elephant” to the elephant photo. Then you can add “wildlife” to both and nest lion and elephant underneath that keyword. So if you search for all wildlife, you can see both of those images together.
Lightroom Master Catalog management tips
Next, I want to discuss some best practices and tips when handling a master catalog. This advice is meant to help you have the best, safest, and most productive experience possible.
Backing up your Master Catalog
When closing your catalog, you can set your preferred backup frequency. I chose a weekly backup, since a master catalog can take time to back up, and doing it daily would take too much time.
Weekly is usually plenty. This way, if my catalog were to crash, my backup is never older than a week.
The backup is set to upload to my Dropbox in the cloud, making sure I always have it stored safely and within reach.
Note: my master catalog is stored locally, as having it in the cloud can cause issues. Only the backup is stored in the cloud.
How to set up a backup system for your Lightroom Master Catalog
It’s easy; just follow these steps:
- Open the catalog you want to back up
- Select the “Lightroom Classic’ menu at the top
- Open the “Catalog Settings”
- Go to the Backups tab
- Choose a destination for your backup folder (mine is on Dropbox)
- Then select a frequency
- Tadaaaam!
Clearing up storage in your Master Catalog
Making lots of (smart) previews in your catalog can eat up your computer’s storage over time. You can set the catalog to discard older previews automatically, or do it manually.
To set up the automatic discarding of previews:
- Open the catalog you want to back up
- Select the “Lightroom Classic’ menu at the top
- Choose the “Previews” tab
- Under ‘Preview Storage Management,’ you can set the frequency of discarding your previews
To manually discard previews:
- Select the photos you want to discard the previews of
- Select the “Library’ menu at the top
- Go to the “Previews” submenu
- Select any of the discard options you think are relevant
- I usually keep it at discarding the 1:1 previews, but you can go further if needed.
I think this is already a lot of information. Still, if I missed anything or you got some workflows of your own you want to share, feel free to use the comments!