
For those looking to edit their pictures on their mobile phone, Snapseed is a fantastic tool. It was one of the first mobile editing apps and is still one of the biggest. But what do all the controls mean?
At the time of writing, Snapseed is already over ten years old. First launched in 2011, it was soon bought by Google. It’s free for both Android and iOS users.
The app is one of the most extensive photo apps you can download. Especially considering it’s a free app.
And for the more demanding users, it also supports RAW editing, which makes it a powerful tool for any type of photographer.
The advantages of editing your photos on mobile (in Snapseed)
Editing your photos on the go allows you to fill in those dull moments. On the train, on the toilet, or just on the couch while watching a Netflix show you’re actually not that interested in, but your significant other wants to see it desperately, even though you told them they could watch it alone and you’d like to watch a show together both of you enjoy but they’ve been so stubborn, and you are okay with because now you can finally get to editing those photos of a while back.
Anyway.
It also allows you to post your photos on social media quickly. As the edit and export happen on your phone, you can quickly upload it in any app.
Here are a few tips to edit your photos on mobile
As mentioned, editing your photos on mobile has a lot of advantages. But it’s also essential to pay attention to a couple of things when you do so.
- Turn of eye comfort and adjust the screen brightness to a comfortable level
- Place yourself somewhere you can easily see your screen. Often in the shade in the best
- When possible, use a raw photo.
- Experiment with all the sliders. See how they affect your photo and if you like it.
Looks in Snapseed
The first tab you see when opening a photo in Snapseed is the Looks tab.
These looks are presets you can add to your photos. At the bottom of your screen, you’ll see several different looks you can use. Easy for a quick edit, but unfortunately, you can’t edit them further.
The tools in Snapseed
With the tools in Snapseed, you can adjust specific things in your photo. You can change the brightness or vibrance. Or the warmth. It’s up to you to choose what you like to see.
Of course, you need to know what all the sliders mean. So that’s why I made this guide for you.
First, you need to get the hang of controlling the tools. Whenever choosing a tool, you can select which tool you’d like to use specifically from a submenu.
Do this by pressing on your photo and sliding up and down.
You can adjust the intensity by sliding left and right on your photo whenever you choose a tool. Easy as that.
Tune Image
The features under this tab are the most common and valuable. It’s almost everything you need.
You’ll use this tab on almost all your photos. That’s why Snapseed has conveniently put it as the first one. Changes are on most images; it’s the only tab you’ll need.
- Auto adjusts: With this button at the bottom (the magic wand), you can let Snapseed edit your photo for you. It works surprisingly well, but it’s not always the best option. But it can be a good starting point or inspiration.
- Brightness: This makes your photo darker or brighter. It is helpful if you accidentally over or underexposed your image.
- Contrast: Give more or less contrast to your images.
- Saturation: This enhances the intensity of the colors in your photo. Make them more vibrant or dull to your taste.
- Ambiance: Similar to contrast, it focuses more on your photo’s darker and lighter areas.
- Highlights: Make the brightest parts of your photo darker and brighter
- Shadows: Make the darkest parts of your photo darker and brighter
- Warmth: Warm up the image by making it more yellow. Or colden it by making it more blue.
- Use the comparison tool at the top right to see what your edits are doing to your original image.
Details
You’ll find all the tools to sharpen your image in this category. There are two sliders to help you with that. It’s best not to overdo either of them. But they are helpful.
- Structure: Enhances the detail in the photo
- Sharpening: enhances the sharpness in your photo
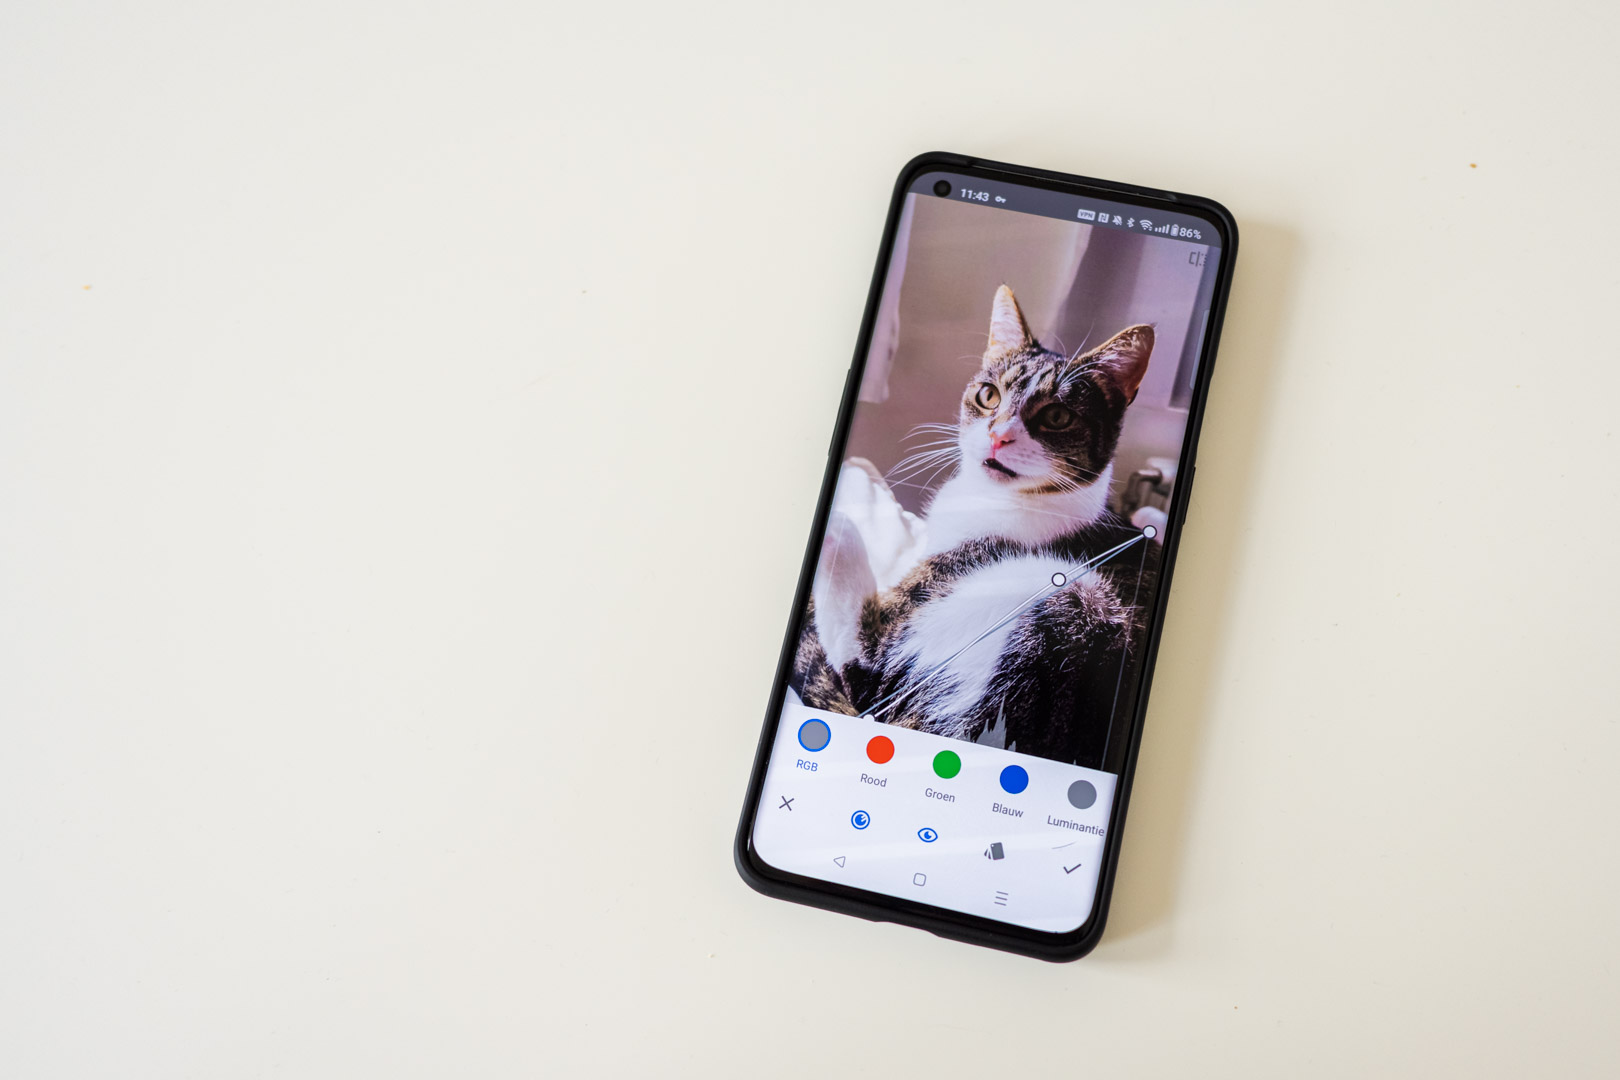
Curves
Tone curves are often confusing for people new to editing. But they are worth your time figuring out, as they are handy in the editing part of making photos.
You’ll see three options at the bottom of your screen:
- RGB: allows you to work on all color channels together.
- Red, green, blue: will enable you to work on all color channels individually.
- Luminance is similar to the RGB feature but works more cohesively with all the channels.
The eye button hides and reveals the curve overlay so you can see what you are doing better;
The cards give you a catalog of curve preset options.
White Balance
White balance helps you to get your whites white. Our brains do it for us, but cameras aren’t always as successful.
Every type of lighting has a color. A lightbulb is different than the sun.
You’ll notice this at a restaurant. Often, the photos you make there are far more yellow than you thought it was. With this tool,t you can make it less yellow again.
- Auto white balance: This lets Snapseed decide the white balance. It’s often reasonably correct. So it’s an excellent option to use.
- Temperature: Adjust the warmth of your photo by making it colder or warmer.
- Tint: Adjust your photos’ purple or green tones to correct your white balance.
Crop
As the name suggests, this tool allows you to crop your photos. Zoom in or change the aspect ratio to your liking.
- Free: You can freely crop your photo and change the aspect ratio as you like
- Original: keeps the ratio to the original photo
- 1:1: Crops your image into a square
- DIN: This is the ratio used for A4 paper in Europe
- 3:2: The standard aspect ratio for DSLR cameras
- 4:3: The standard ratio for televisions and screens
- 5:4: The ratio used for Instagram.
- 16:9: The movie and instastories ratio
The rotational arrow at the bottom allows you to change the crop horizontally or vertically.
Rotate
This tool allows you to straighten your photos. Or make them even more rotated. It’s how you decide you want your image to look.
By swiping left or right, you can adjust the angle of your photo. Making the horizon straight again.
With the buttons at the bottom, you can mirror your photo or rotate it 90 degrees.
Perspective and expand
With perspective, you can make the perspective of your photo more or less dramatic to your choosing.
You can rotate or resize your photo. However, with this tool, it does leave some white borders. So, for that, it’s best to use the crop function.
At the bottom, you can choose if you want that white border to be any other color. You can also select ‘smart,’ allowing Snapseed to generate a background based on your photo. However, it’s not their best feature.
Selective
With this feature, you can adjust all the parameters from the tune image feature. But you can do them on a select part of the image. For example, only change the highlights in the sky.
You tap your subject, and Snapseed does its best to recognize it. Of course, this isn’t always perfect. You can use the brush as a backup solution if it doesn’t work well enough.
Brush
With the brush, you can paint where you’d like your edit to impact the image. It’s almost literally like painting your preferred effect on the image.
Effects
All the other features you can find in the overview on Snapseed are presets you can adjust to some degree. They allow you to give your photo a specific look. Though they are fun, it’s usually just once in a while.
- Healing: This tool allows you to remove or face away objects in your image. Perhaps some tiny things that bother you.
- HDRscape: This filter shows as many details in your image as possible. Unfortunately, it isn’t always as pretty. One that can be useful for architecture and landscapes. But I’d certainly not overuse it.
- Glamour glow: This gives an old-school romantic era vibe to your photo.
- Tonal contrast: This feature gives you more options to work on your contrast.
- Drama: As the name suggests, this filter adds a particular drama to your photos.
- Vintage: gives your photo an analog film-style look.
- Grainy film: adds grain to your image, giving it a rougher old-school look.
- Retrolux: This adds old school film type damage to your photo
- Grunge: Gives your image a grungy rockers type of look.
- Black & White: Make a black and white version of your photo.
- Noir: Black and white with a high contrast. Similar to the old Noir movies.
- Portrait: This allows you to edit specific parts of the face.
- Head pose: You can edit the smile, eyes, and head shape.
- Lens blur: Blur specific parts of your photo
- Vignet: Makes the edges of your image darker or lighter.
- Double exposure: Let’s add another photo to your photo and let them blend.
- Text: Adds text to your photo
- Frames: Let’s you put a frame around your image.
Edit all layers
When all your editing is done, you can rewatch what you did with the button at the top right. De two squares with an arrow.
There, you can see all the layers. You can still change your edits there, too, if you like.
Export from Snapseed
After editing, you want to share your photo with the world by posting it on social media.
Under the button ‘export’ at the bottom right, you can choose four ways.
- Share: Share your image straight to social media.
- Save: Save your photo over the original.
- Save a copy: Saves your edits as a separate photo, keeping the original too.
- Export: Let’s you choose where you want to save the image. It’s handy if you’re particular about sorting things.
Hopefully, I covered all your questions with this guide. If not, feel free to send me an email at frederic@fredography.be
5 thoughts on “The extensive guide to editing your mobile photos in Snapseed”